
In this article lets’ discuss on how to generate ssl certificates for a website
In Horizon Cloud in 3 places we need the certificates
- Pod Certificates
- UAG certificates
- Universal broker certificates
Pod certificates can be created as self signed since we won’t directly connect to POD Load balancer also this will be used for Workspace One access trust
When you deploy UAG for external use – if we use self signed certs browser always gives certificate error
If you would like to choose UB custom URL then you have to upload custom domain certificates
For homelabs, by using let’s encrypt we can avoid the extra cost for purchasing certs ,
To generate the SSL certificate , I will be using Let’s Encrypt’s Certbot
To know more about how Let’s Encrypt & Cerbot works , please visit the below pages
https://letsencrypt.org/docs/
https://certbot.eff.org/pages/about
Steps to generate certificate
Step : 1
apt-get update
apt-get install python3


#To check whether Python or git installed use below commands

python3 --version
Step: 2
sudo apt-get install letsencrypt
Step- 3
sudo certbot certonly --manual --preferred-challenges=dns --email xxxxxxx@gmail.com --server https://acme-v02.api.letsencrypt.org/directory --agree-tos -d thecloudwiki.com -d *.thecloudwiki.com

or

sudo certbot certonly \
--manual \
--preferred-challenges=dns \
--email xxxxxxxx@gmail.com \
--server https://acme-v02.api.letsencrypt.org/directory \
--agree-tos -d thecloudwiki.com -d *.thecloudwiki.com

#by default since the generated certificate key will be ECDSA , some of the web servers won't accept it , we have to change the algorithm to RSA in most of the cases

--manual \
--preferred-challenges=dns \
--email xxxxxxxx@gmail.com \
 --key-type rsa \
--server https://acme-v02.api.letsencrypt.org/directory \
--agree-tos -d thecloudwiki.com -d *.thecloudwiki.com
When you see ” Press Enter to Continue” – please don’t hit on Enter till you create the TXT record in step- 4
Example : 
Step: 4
Login to your account from where you registered the domain ( in my case it’s godaddy)
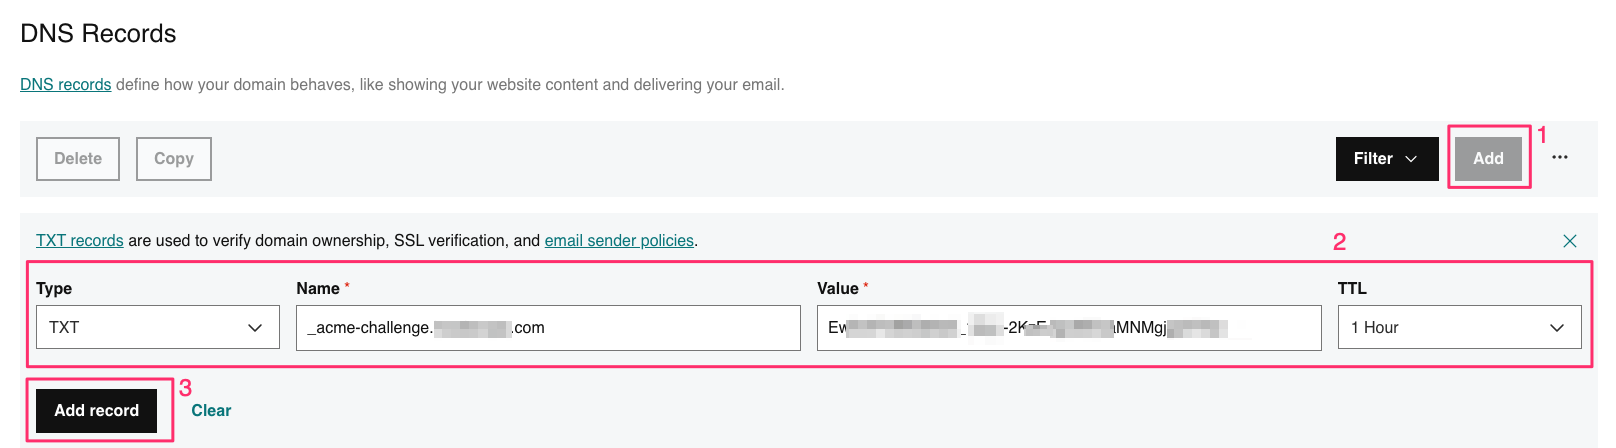
Now use the google toolbox to check to verify the challenge
https://toolbox.googleapps.com/apps/dig/#TXT/<copy the info of ‘Please deploy a DNS TXT record under the name’ from Step-3>
in my case I will launch the URL as – https://toolbox.googleapps.com/apps/dig/#TXT/_acme-challenge.thecloudwiki.com
Once you see the challenge that you have entered in the DNS provider website like below , go ahead and click on enter on certbot certificate creation page 
Step- 5
If the certificate creation is success then you see the below message on the terminal
- - - - - - - - - - - - - - - - - - - - - - - - - - - - - - - - - - - - - - - -
Press Enter to Continue

Successfully received certificate.
Certificate is saved at: /etc/letsencrypt/live/hcsdevops.com/fullchain.pem
Key is saved at:         /etc/letsencrypt/live/hcsdevops.com/privkey.pem
This certificate expires on 2023-03-18.
These files will be updated when the certificate renews.

NEXT STEPS:
- This certificate will not be renewed automatically. Autorenewal of --manual certificates requires the use of an authentication hook script (--manual-auth-hook) but one was not provided. To renew this certificate, repeat this same certbot command before the certificate's expiry date.

- - - - - - - - - - - - - - - - - - - - - - - - - - - - - - - - - - - - - - - -
If you like Certbot, please consider supporting our work by:
 * Donating to ISRG / Let's Encrypt:   https://letsencrypt.org/donate
 * Donating to EFF:                    https://eff.org/donate-le
- - - - - - - - - - - - - - - - - - - - - - - - - - - - - - - - - - - - - - - -
Example :
Step: 6
# you can view the generated certificates here

root@LINUX01:~/certbot# certbot certificates
Saving debug log to /var/log/letsencrypt/letsencrypt.log

- - - - - - - - - - - - - - - - - - - - - - - - - - - - - - - - - - - - - - - -
Found the following certs:
  Certificate Name: thecloudwiki.com
    Serial Number: 485axxxxxx866e5850xxxxxxxx44
    Key Type: ECDSA
    Domains: thecloudwiki.com *.thecloudwiki.com
    Expiry Date: 2023-03-18 09:06:49+00:00 (VALID: 89 days)
    Certificate Path: /etc/letsencrypt/live/thecloudwiki.com/fullchain.pem
    Private Key Path: /etc/letsencrypt/live/thecloudwiki.com/privkey.pem
- - - - - - - - - - - - - - - - - - - - - - - - - - - - - - - - - - - - - - - -
Step: 7
Since the above generated certificate is valid only for 89 days , you can use below command to renew the same
certbot certonly --manual --server https://acme-v02.api.letsencrypt.org/directory -d thecloudwiki.com -d *.thecloudwiki.com

#for RSA renew

certbot certonly --manual --server https://acme-v02.api.letsencrypt.org/directory  --key-type rsa -d thecloudwiki.com -d *.thecloudwiki.com
Copy the certs from the Step-6 and upload to UAG’s & Universal Broker
![Horizon Cloud on Azure – Introduction [Part-1]](https://thecloudwiki.com/wp-content/uploads/2021/04/HZC-intro-feature-image-1024x624.png)
![Horizon Cloud on Azure – POD Deployment & Troubleshooting [Part-2]](https://thecloudwiki.com/wp-content/uploads/2021/04/HZC-POD-deployment-feature-image-1024x636.png)